One-Shotting an Apple Silicon Monitor with Claude Opus 4.7
I’ve been curious about how much real work Claude Opus 4.7 with 1M context can handle in a single pass — no back-and-forth, no babysitting, no “now fix this bug.” So I picked something I’d actually use and typed one short paragraph.
The prompt
Here it is, verbatim, typos and all:
lets build a mac monitoring system that shows gpu
lets use
uv for package management and tui
we need to see e-cores and p-cores and also gpu and npu to see what is being run
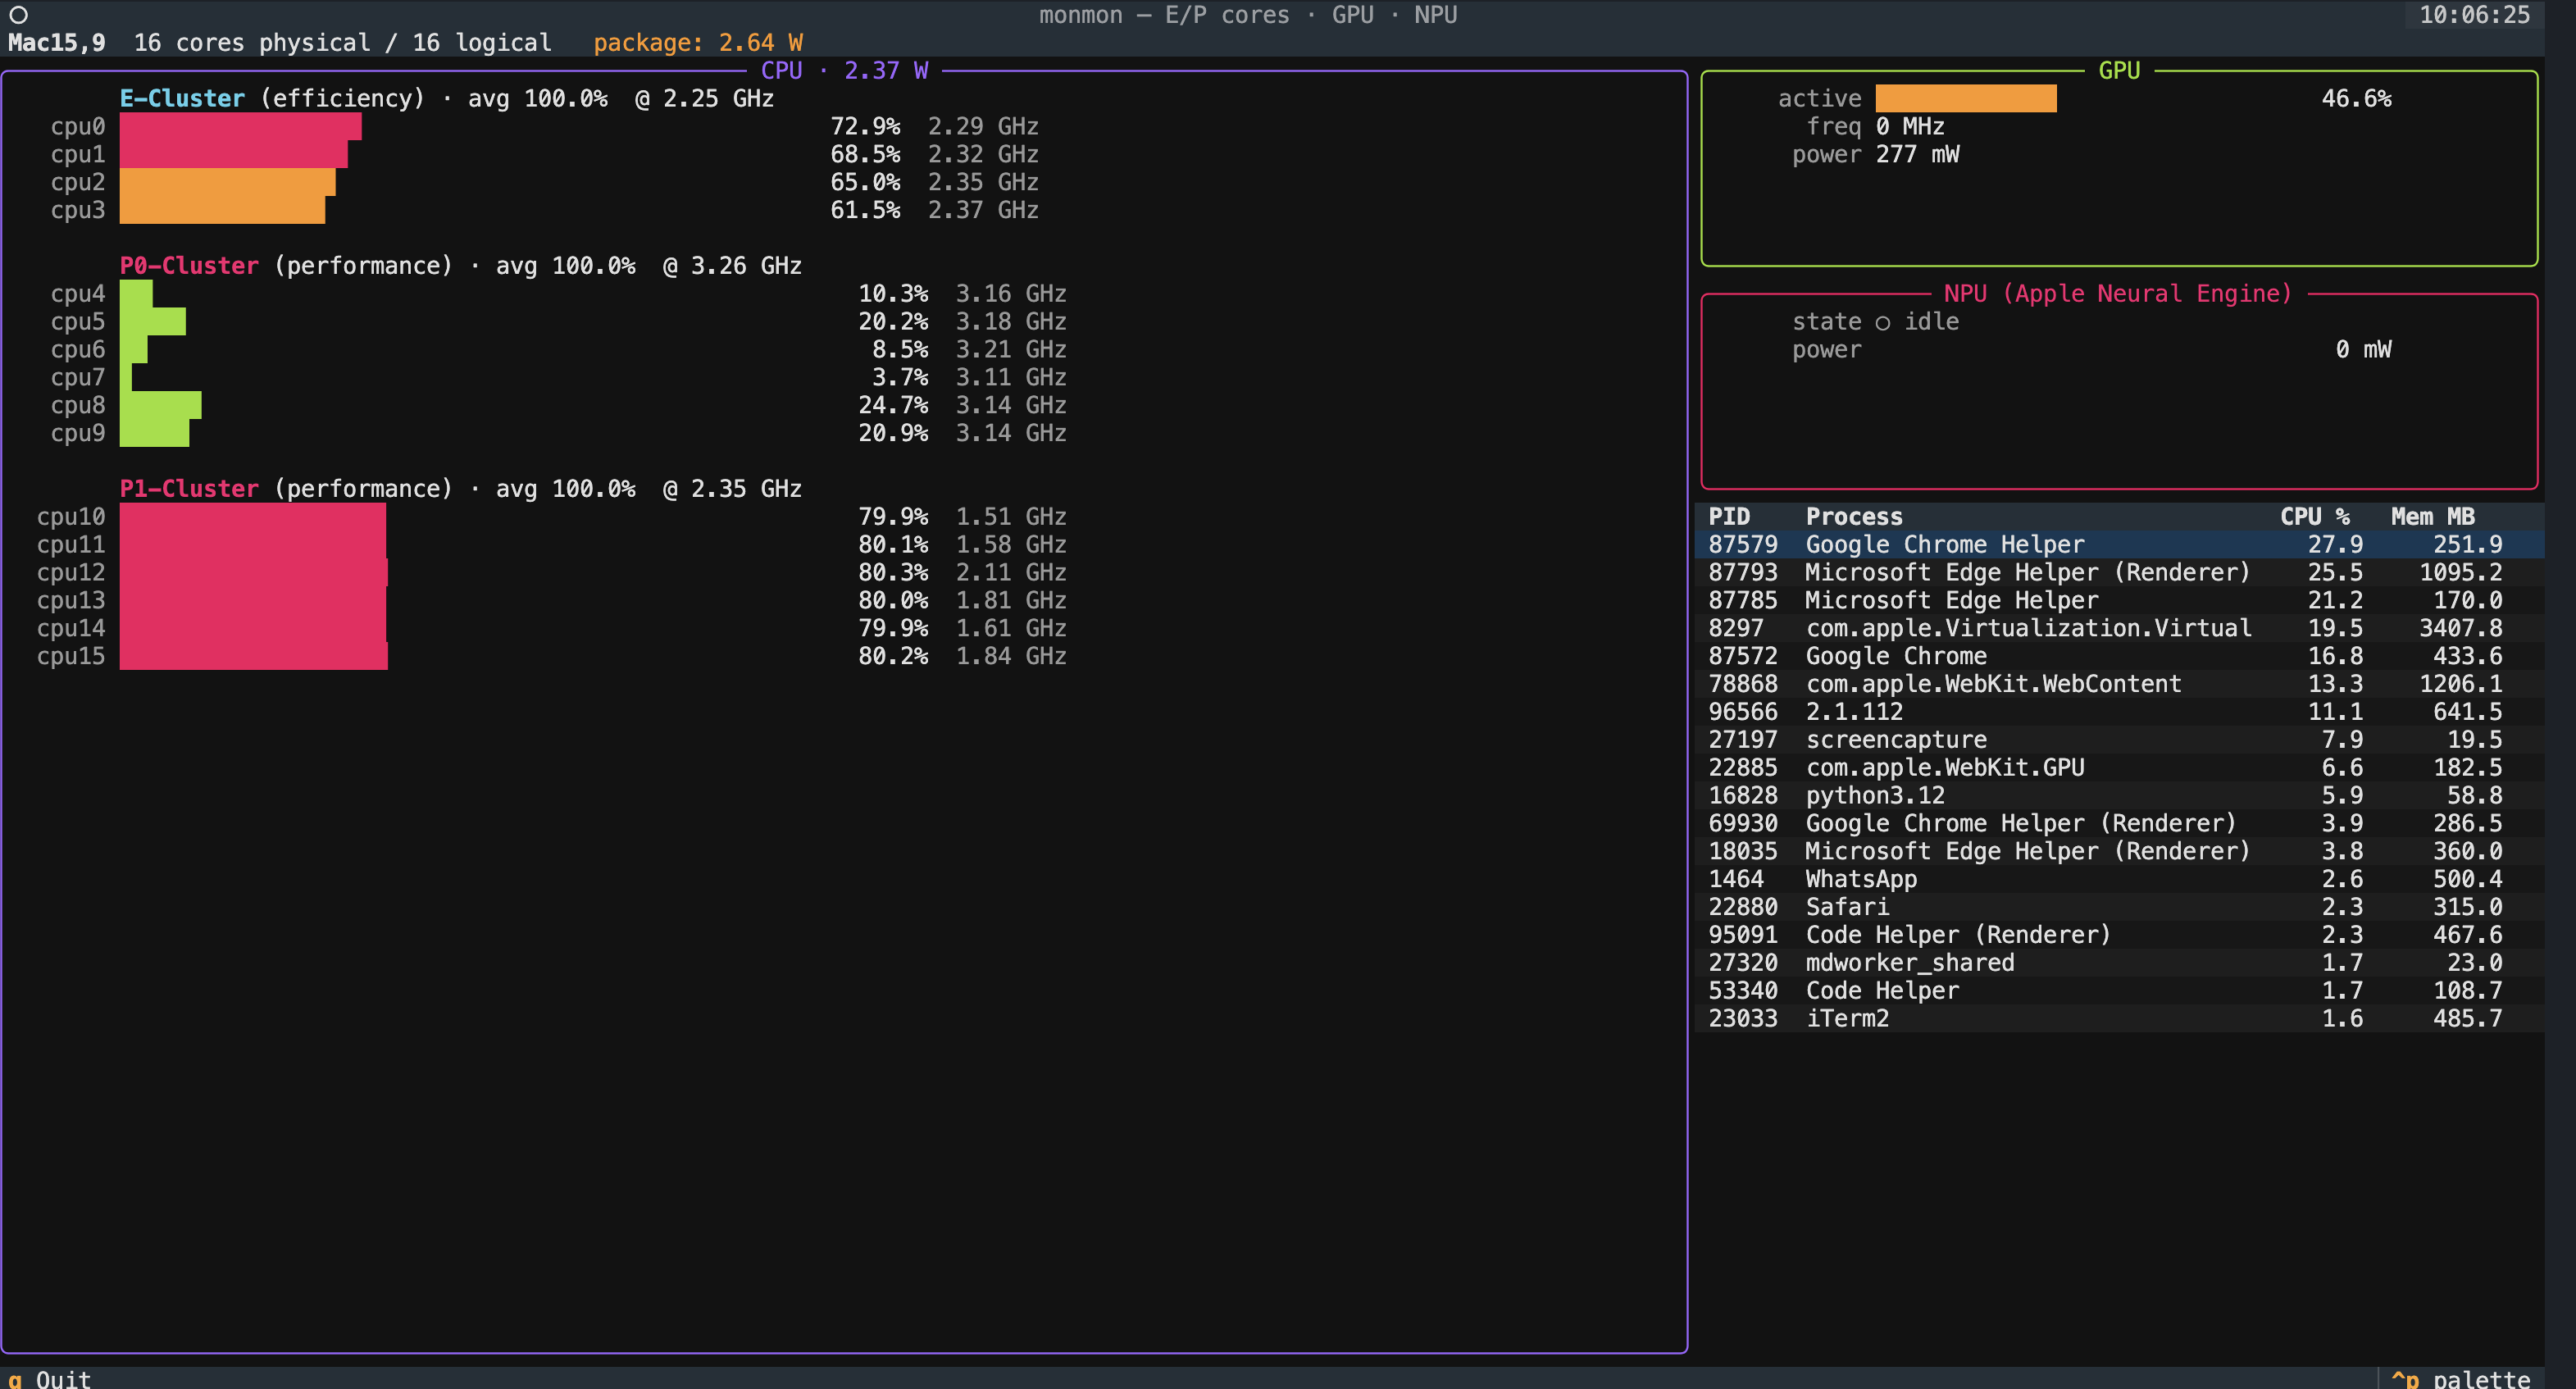
go ahead a build itThat’s the entire design spec. What came back a few minutes later is the app in the screenshot above — monmon, a live TUI for watching Apple Silicon work.
What it shows
Apple’s M-series chips have two very different kinds of CPU cores (efficiency and performance), plus a GPU, plus the Apple Neural Engine (which Apple calls the NPU). macOS hides almost all of this from Activity Monitor. If you want to see what’s actually running where — say, whether a PyTorch model is using the Metal GPU or the ANE — you’ve had to either wrestle with powermetrics in a terminal or buy a third-party app.
monmon gives you four panels in one screen:
- CPU panel — every E-core and P-core, one bar per core, colored cyan for efficiency clusters and magenta for performance clusters. Each bar shows active residency; alongside each row is the current per-core frequency.
- GPU panel — active residency, frequency, and power draw.
- NPU panel — Apple Neural Engine state and power. (
powermetricsdoesn’t expose an active-residency counter for the ANE, so monmon infers “in use” from power draw.) - Process table — top processes by CPU, so you can correlate a spike in any of the panels above with an actual process.
On the screenshot above you can see my MacBook under light load: the E-cluster is idle, the two P-clusters are doing the real work, GPU is at 46% driving the display, and the ANE is sitting at 0 mW (nothing is currently using it).
How it works under the hood
There’s exactly one piece of Apple plumbing driving all of this: powermetrics -f plist with the cpu_power, gpu_power, and ane_power samplers. It emits one XML property list per sample, separated by a NUL byte. monmon spawns a single root-owned process on startup, reads the stream, splits on NUL, and parses each plist into a structured snapshot that Textual widgets react to.
That’s the whole architecture. No polling loops, no per-sample subprocess, no scraping text output. The parser is under 200 lines in src/monmon/power.py and is the thing I’m most pleased with — it handles cluster-name variance across chips (E-Cluster, E0-Cluster, ECPU), and power keys that move between the processor dict and the top-level dict depending on the macOS version.
The UI is Textual. The process table is psutil — because powermetrics’ per-task sampler is inconsistent across macOS versions, and psutil gives you reliable CPU/memory numbers that answer the “what’s running?” question without a second subprocess.
From prompt to brew install
Here’s what Claude actually produced in that single session:
- Initialized a
uvproject, picked Textual + psutil, laid outsrc/monmon/. - Wrote the
powermetricsreader with a NUL-delimited plist parser (validated with a synthetic plist round-trip before trusting it against real output). - Built the Textual app: CPU panel with per-core bars, GPU panel, ANE panel, process table.
- Wired
pyproject.tomlfor amonmonCLI entry point, MIT license, classifiers, URLs. - Wrote a
CLAUDE.mdwith design notes for future sessions.
Then, in a few follow-up turns (not part of the “one-shot” for the app itself, but the same session), Claude also:
- Published
monmonto PyPI viauv build && uv publish. - Generated a Homebrew formula for a personal tap, filled in all eleven transitive-dependency resource blocks from the
uv.lockversions + PyPI JSON API, ranbrew audit --strict --onlineandbrew test(both clean), and published it to github.com/gavi/homebrew-monmon.
Total time from prompt to a working brew install: about 45 minutes of wall-clock, most of which was me reading PyPI confirmation pages.
Where the 1M context mattered
The obvious place was the Homebrew formula. Brew has a specific idiom for Python CLIs — Language::Python::Virtualenv, one resource block per transitive dep with exact PyPI URLs and sha256s. I hit a snag where brew update-python-resources refused to generate those blocks because monmon had just been uploaded to PyPI and fell outside Homebrew’s “reproducibility cutoff” timestamp. Without prompting, Claude pivoted to generating the resource blocks manually: walk the uv.lock, hit https://pypi.org/pypi/<name>/<version>/json for each, emit the Ruby stanza. Problem gone.
That kind of course-correction — recognizing the failure mode, knowing the API, writing the script, splicing the output into the right spot in the formula — is what 1M context buys you. A shorter context window either forgets why you’re doing this or can’t hold the full formula + lockfile + tool output at once.
Install it
brew install gavi/monmon/monmon
monmon
macOS will prompt for your password once (monmon reads powermetrics, which requires root), then the TUI comes up.
Source and the full origin-prompt writeup: github.com/gavi/monmon. The CLAUDE.md in the repo has the design constraints to preserve if you fork it.
Taking stock
I’m not claiming every app can be built this way. monmon is small, well-scoped, and sits on top of a single well-behaved data source (powermetrics). It’s exactly the kind of project that exposes how good the models have gotten — no novel research, no ambiguous product decisions, just “read these bytes, render them nicely, ship it as a package.”
But the fact that this particular app, with this particular toolchain (uv, Textual, PyPI, Homebrew), went from a four-line prompt to brew install gavi/monmon/monmon without me writing a single line of Python — that would have been science fiction a year ago. Now it’s a Thursday afternoon.