iPhone SDK 3.0 - Playing with Map Kit - Part 3
This is a follow up post to my 2 previous posts on the same subject. Please check them here.
iPhone SDK 3.0 - Playing with Map Kit iPhone SDK 3.0 - Playing with Map Kit - Part 2
We also started a basics training program in iPhone development. If you or some one you know wants to learn development and live around NYC area, Please promote this
Blog Entry:http://blog.objectgraph.com/index.php/2009/05/13/iphone-developer-training-in-ny-city/ Meetup Group: http://www.meetup.com/iPhoneDeveloper
Many of the users were asking me how to draw a polyline on this map. From what i can see in the documentation as of today, there are no classes that provide this yet.
I am using this as a source of documentation. This might change in the near future as there is still time before the official release of the iPhone 3.0
You can draw something on the view using Quartz but I think this is not as useful as drawing directly on the map.
Currently you can do the following very easily as i explained in my previous posts.
- Display a Map in different styles (Standard, Satellite, Hybrid)
- Show current location
- Get current location
- Create an annotation
- Reverse Geocode lat and long to get more info about the location
So just by using this limited API you could create different kinds of applications.
- Friend Track Apps (Like Loopt)
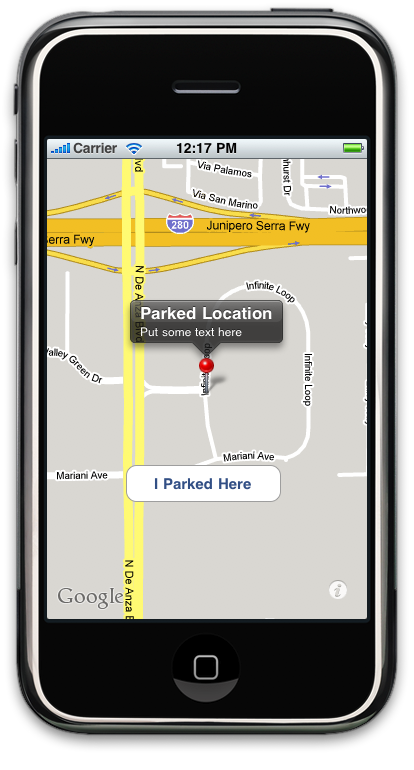
- Car Park Finder (Just add an annotation where you left the car)
I found out the best way to get a users location is by using CoreLocation as it provides a nice delegate to let me know when the coordinates are obtained from the GPS asynchronously.
So I was able to combine the MapKit and the Core Location API to zoom into your current location and place an Annotaion.
Here is some of the code.
Header File
#import "FlipsideViewController.h"
#import "ParkPlaceMark.h"
#import
#import
#import

@interface MainViewController : UIViewController  {
	MKMapView *mapView;
	MKPlacemark *mPlacemark;
	CLLocationCoordinate2D location;
	IBOutlet UIButton *mStoreLocationButton;

}

- (IBAction)showInfo;
- (IBAction)storeLocationInfo:(id) sender;

@end
Code File
#import "MainViewController.h"
#import "MainView.h"


@implementation MainViewController


- (id)initWithNibName:(NSString *)nibNameOrNil bundle:(NSBundle *)nibBundleOrNil {
 if (self = [super initWithNibName:nibNameOrNil bundle:nibBundleOrNil]) {
 // Custom initialization
 }
 return self;
}


 // Implement viewDidLoad to do additional setup after loading the view, typically from a nib.
 - (void)viewDidLoad {
 [super viewDidLoad];
	 mapView=[[MKMapView alloc] initWithFrame:self.view.frame];
	 //mapView.showsUserLocation=TRUE;
	 mapView.delegate=self;
	 [self.view insertSubview:mapView atIndex:0];


	 CLLocationManager *locationManager=[[CLLocationManager alloc] init];
	 locationManager.delegate=self;
	 locationManager.desiredAccuracy=kCLLocationAccuracyNearestTenMeters;

	 [locationManager startUpdatingLocation];

 }


- (void)flipsideViewControllerDidFinish:(FlipsideViewController *)controller {

	[self dismissModalViewControllerAnimated:YES];
}


- (IBAction)showInfo {

	FlipsideViewController *controller = [[FlipsideViewController alloc] initWithNibName:@"FlipsideView" bundle:nil];
	controller.delegate = self;

	controller.modalTransitionStyle = UIModalTransitionStyleFlipHorizontal;
	[self presentModalViewController:controller animated:YES];

	[controller release];
}

- (void)didReceiveMemoryWarning {
	// Releases the view if it doesn"t have a superview.
 [super didReceiveMemoryWarning];

	// Release any cached data, images, etc that aren"t in use.
}

- (void)viewDidUnload {
	// Release any retained subviews of the main view.
	// e.g. self.myOutlet = nil;
}


- (void)dealloc {
 [super dealloc];
}


- (void)reverseGeocoder:(MKReverseGeocoder *)geocoder didFailWithError:(NSError *)error{
}

- (void)reverseGeocoder:(MKReverseGeocoder *)geocoder didFindPlacemark:(MKPlacemark *)placemark{
	NSLog(@"Geocoder completed");
	mPlacemark=placemark;
	[mapView addAnnotation:placemark];
}

- (MKAnnotationView *)mapView:(MKMapView *)mapView viewForAnnotation:(id )annotation{
	NSLog(@"This is called");
	MKPinAnnotationView *test=[[MKPinAnnotationView alloc] initWithAnnotation:annotation reuseIdentifier:@"parkingloc"];
	if([annotation title]==@"Parked Location")
	{
		[test setPinColor:MKPinAnnotationColorPurple];
	}
	else
	{
		[test setPinColor:MKPinAnnotationColorGreen];
	}
	return test;
}

- (void)locationManager:(CLLocationManager *)manager didUpdateToLocation:(CLLocation *)newLocation fromLocation:(CLLocation *)oldLocation{
	mStoreLocationButton.hidden=FALSE;
	location=newLocation.coordinate;
	//One location is obtained.. just zoom to that location

	MKCoordinateRegion region;
	region.center=location;
	//Set Zoom level using Span
	MKCoordinateSpan span;
	span.latitudeDelta=.005;
	span.longitudeDelta=.005;
	region.span=span;

	[mapView setRegion:region animated:TRUE];

}

- (void)locationManager:(CLLocationManager *)manager didFailWithError:(NSError *)error{
}

- (IBAction)storeLocationInfo:(id) sender{
	//Either we can use geocoder to get a placemark or just create our own.
	/*
	MKReverseGeocoder *geocoder=[[MKReverseGeocoder alloc] initWithCoordinate:location];
	geocoder.delegate=self;
	[geocoder start];
	*/
	//Our own

	ParkPlaceMark *placemark=[[ParkPlaceMark alloc] initWithCoordinate:location];
	[mapView addAnnotation:placemark];
}


@end
Also you could use a reverse Geocoder to obtain a placemark or create your own annotation. Here is some code on how to quickly create your own annotation by implementing the MKAnnotation protocol.
Header File
#import
#import


@interface ParkPlaceMark : NSObject {
	CLLocationCoordinate2D coordinate;
}
@property (nonatomic, readonly) CLLocationCoordinate2D coordinate;
-(id)initWithCoordinate:(CLLocationCoordinate2D) coordinate;
- (NSString *)subtitle;
- (NSString *)title;

@end

@end
Source File
#import "ParkPlaceMark.h"

@implementation ParkPlaceMark
@synthesize coordinate;

- (NSString *)subtitle{
	return @"Put some text here";
}
- (NSString *)title{
	return @"Parked Location";
}

-(id)initWithCoordinate:(CLLocationCoordinate2D) c{
	coordinate=c;
	NSLog(@"%f,%f",c.latitude,c.longitude);
	return self;
}
@end
